Tip Junkie

Blogging 101: Favicons

First–Thank you to everyone who added their input in the comments section of last week’s Blogging 101 post!  It was fun to read so many thoughts about what makes a great blog.  Now let’s get to this week’s question!

blogging tips Blogging 101: Favicons

This week’s question:

Q: How do I add a favicon to my blogger blog?

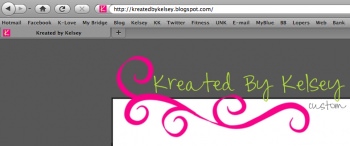
A: Let’s first take a look at what a favicon is!  A favicon is like a logo–it’s the little image that shows up next to a website’s address.  On blogger, you’ll see the orange and white “B”.

blogging tips Blogging 101: Favicons

So let’s take a look at how to change your blog’s favicon to something more fun.  It’s truly a great way to make your blog standout!

Step 1:

First we need to create a small image that we can turn into a favicon.  To do this, you’ll need some sort of editing program.  If you don’t have a purchased program such as Photoshop, there are many free options that will work great for our purposes!  My personal favorite is Gimp, but you can use anything from Picnik to your basic Paint program.

The image you create needs to be 15X15 pixels.  Keep in mind that this is very small, so consider creating something simple!

Step 2:

Once you’ve created an image that you’re happy with, save it to your computer as either a .jpg, .png, or .gif file.

Step 3:

After you’ve saved your image, we need to find a favicon generator on the web.  I suggest going to http://iconj.com/.

Step 4:

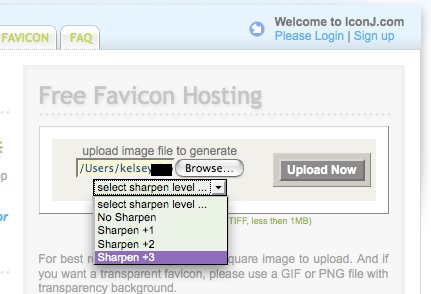
Once there, find where it says “Free Favicon Hosting”.  Click on “Browse” to find and select the image you just saved to your computer.  After you’ve selected your image, select a sharpen level of “Sharpen +3″ as I’ve shown here in purple.

blogging tips Blogging 101: Favicons

Step 4:

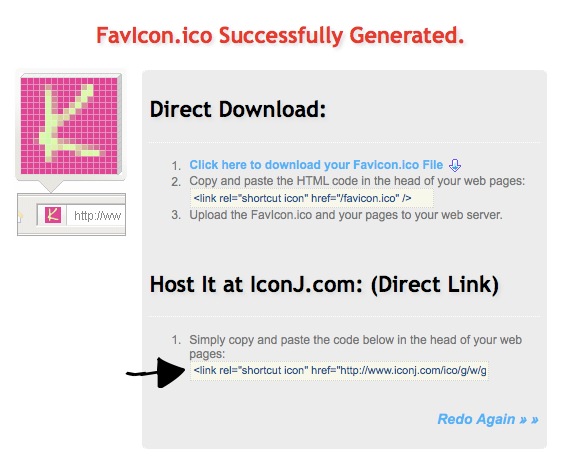
Once you’ve selected the sharpen level, click on “Upload Now”.  You will then see a page that says you’ve uploaded your image successfully.  On this page, highlight and copy the link from the “Direct Link” section.

blogging tips Blogging 101: FaviconsStep 5:

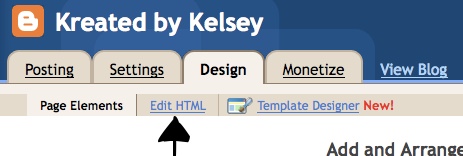
Go to your blogger dashboard and select “Design”.

blogging tips Blogging 101: FaviconsUnder the design tab, select “Edit HTML”.

blogging tips Blogging 101: Favicons

*NOTE: I would strongly recommend backing up your template before completing the next steps!*

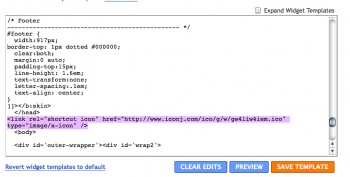
Once in your HTML section, search the page for the following: </head>

blogging tips Blogging 101: Favicons

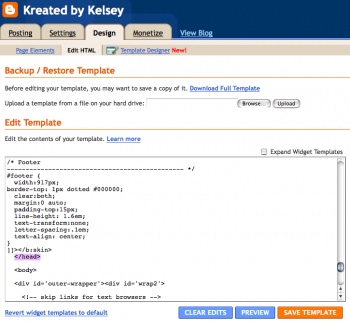
Place the code you copied from the favicon site directly after the </head> code you just searched for.

blogging tips Blogging 101: FaviconsStep 6:

Save your template and then take a look at your blog.  If your favicon doesn’t show up right away, try refreshing the page.   Now instead of the standard logo, your blog should have a cute favicon of it’s own!

blogging tips Blogging 101: Favicons

Keep in mind that while favicons show up in most browsers, they will not appear in all of them.  Good luck everyone!

Do you have a question you want me to answer?  Leave a comment!  :)

Comments


  1. keely aka LKP says: #1

    oh.my.gosh!
    you are AWESOME.
    thank you gobs & gobs!

    Reply


  2. Crystal & Co says: #2

    Have you had issues with favicons not showing up in Internet Explorer?

    I have a favicon, but I have to use Safari, for example, before I can see it in the broswer…..

    Is there a solution for that?

    Reply


    • Kelsey @ Kreated By Kelsey says: #3

      As far as I know, there is no solution. Internet Explorer is rather notorious for issues like this. I know that many people are simply steering clear of IE these days, so hopefully the majority of your readers will use browsers that it shows up on!

      Reply


  3. Isabel says: #4

    Thank you so much for the information, you are awesome!

    Reply


  4. Krista says: #5

    You are the best! Thanks so much

    Reply


  5. Becca says: #6

    Thank you goddess of the internet and html. You made that painless and easy and I am not even cursing!

    Reply


  6. Tricia Bertrand says: #7

    Hi! This is great, but do you know if it works with the Firefox browser? I followed your directions, but it is not showing up. Such a cute idea too!! =)

    Reply


    • Kelsey @ Kreated By Kelsey says: #8

      It should show up on Firefox! If you are still not seeing it, email me at kreatedbykelsey@hotmail.com and I can try to help you!

      Reply


  7. Anne@LittleSproutBooks says: #9

    Didn’t even realize such customization was possible – wow! Thanks for the simple instructions!

    Reply


  8. heidi@thecraftmonkey says: #10

    awesome! Thanks so much! I actually was able to do it {right} on the 1st try!! Tip Junkie, you are awesome!

    Reply


  9. Kara says: #11

    Awesome! I just did a favicon for my blog and it turned out great! The directions were so easy to follow! Thank you bunches!

    I used picnik to resize my image and I used the recommended FavIcon Labs website to create a free favicon.

    Great tip! Much appreciated!

    Kara @ Mine for the Making

    Reply


  10. Carolina Moore {Expect Moore} says: #12

    Woot! I’ve been wanting to do this. Thanks for the great tutorial. I’ve now got a great little favicon!
    Carolina

    Reply


  11. Lindsay says: #13

    Wow! Thank you so much for sharing!!

    http://homelifestyledesign.blogspot.com

    Reply


  12. Miss Muffin says: #14

    Thanks for that tutorial – I tried to make my own favicon. (Did not even know what a favicon is before!) But I am having trouble … problem is in my html code there is no
    There is only
    And if I put the copied bit behind that nothing happens at all …
    Do you know why there is no in my code and what I could do to still add a favicon???

    And thanks again for your help – I love the whole series!!!

    Reply


  13. Miss Muffin says: #15

    Hm, for some reason I can’t find the html-code where I should put the link. It does not exist in my code. Any suggestions?
    (And I can not post the code in the comments … it does not show up …)

    Reply


    • Kelsey @ Kreated By Kelsey says: #16

      Hi Miss Muffin! Can you email me at kreatedbykelsey@hotmail.com? I will try to take a look and see if I can help you. :)

      Reply


  14. Jill says: #17

    Thanks so much! That was super easy!!

    Reply


  15. Robin Quilts, etc. says: #18

    Kelsey, you’re a star!!!! It worked perfectly. Thank you so much this was just what I had asked for last week. Check it out http://robingallagher.blogspot.com

    Reply


    • Deleted says: #19

      It looks perfect! Thanks for the great question. :)

      Reply


  16. Janet, The Organizing Genie says: #20

    WOW! I’ve been wanting to learn this for some time! Thanks for sharing!!

    Reply


  17. PootleFlump says: #21

    Thanks so much for this. I think it worked! I am totally illiterate when it comes to computers. I dont even have a proper blog header because I dont have a clue how to do it!! Thanks again!! x

    Reply


  18. Jacinda Cote says: #22

    Hi,
    so I did it, but didn’t like it. How can I redo it? I have the new image I like already, I’m just not sure where to put the code, I put it where you said I should but the old one keeps coming up instead.
    thanks sOOO much by the way, this is awesome~
    Jacinda

    Reply


    • Kelsey @ Kreated By Kelsey says: #23

      It might take a day or so to register the change. If it still doesn’t work, email me at kreatedbykelsey@hotmail.com! :)

      Reply


  19. Marilyn says: #24

    Thanks so much for the tip; I’m loving my cute little purple button for my favicon now!!!

    Reply


  20. Carole says: #25

    Thank you for sharing! Its funny how its these little things that bring such joy, and make me smile when I go to my blog!

    Carole
    http://frogbellysoup.blogspot.com

    Reply


  21. all8 says: #26

    Favicon created and finally figured out how to install it to be viewed. (I had to insert the code just before instead of after .) Thank you, thank you! But it doesn’t seem to be showing up on a blog listing at the side, it’s just the usual blogger B, even when add it to my own blog listing. How can I fix this?

    Then to get to work on a new header. The old one doesn’t fit the new template.

    Thanks again. I’ve always wanted to do something like this.

    Reply


  22. Meredith says: #27

    Thank you! This was super easy!

    You’re awesome!

    Thanks again!

    -Meredith @ meredith and maggie

    Reply


  23. Alison says: #28

    Thank you for the great post! That was so quick and easy!

    Reply


  24. Jessica Marquez says: #29

    THANK YOU!

    I am just getting started with this blog and was so excited to read this post… along with you other tutorials!

    Reply


  25. David says: #30

    Very good, thanks for this tutorial.
    David recently posted..5 ressources pour faire votre favicon facilementMy ComLuv Profile

    Reply


  26. mortgage loans says: #31

    That’s understandable that money can make us free. But what to do if someone doesn’t have money? The one way is to try to get the loans or just financial loan.

    Reply


  27. home loans says: #32

    I guess that to get the credit loans from banks you should have a great reason. Nevertheless, once I’ve got a sba loan, because I was willing to buy a car.

    Reply


  28. mortgage loans says: #33

    Don’t have a lot of money to buy some real estate? Do not worry, because it is possible to receive the credit loans to work out all the problems. Thus get a collateral loan to buy all you want.

    Reply


(will not be published)

Tags Allowed: a, abbr, acronym, b, blockquote, code, em, i, strike, strong

CommentLuv Enabled